Hi,
So today I will try to write a simple easy to follow step by step Unity animation guide
(for beginner only)
Step1: Open Unity
Step2: Open Unity Asset Store
Step3: download "Raw Mocap Data for Mecanim" and import into your project
Step4: Add a plane into your scene, as the ground, set the scale x = 5, y=1, z=5
Step5: drag the raw mocap data -> "default avatar" into your scene
Step6: Under your asset folder, create new animation controller, name it "myanimation"
Step7: double click "myanimation" to open it, then drag the "idle_neutral_1.fbx" into it
(idle_neutral_1.fbx located under Assets-> raw mocap data -> animations -> idle)
so here you can see you start the game with your character in idle
Step8: On your animator tab, right click, create state-> From new blender tree, name it "walkforward"
Step9: double click your "walkforward" to open it and click the "+" sign to add motion, add 3 motion
Step10:
a) first motion set as "WalkForwardTurnRight_NtrlShort"
b) second motion set as "WalkForward_NtrlFaceForw"
c) third motion set as "WalkForwardTurnRight_NtrlShort"
as you can see, first motion and third motion also walk forward turn right, but your first motion need to turn left, so you tick the "mirror" button as below
also you click the "0" under the parameter chart, and set it to "-1" just like the display above, this is so later we can tell the computer to turn left when our direction is "-1" , walk foward when direction is "0" and walk right if direction is "1"
Step11:
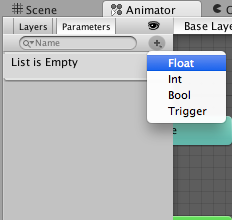
Now go to parameter tab under your animator tab, and click the "+" sign to add 2 new paramater, add a) a new float name as "Speed"
b) a new float name as "Direction"
Step12:
Now go back to base layer under your animator tab, and right click "idle_neutral_1" and make transition, drag the arrow to the "walkforward"
Step13:
a) Click the transition arrow you created, and on the inspector on the right, click the "+" sign to add new condition where speed greater 0.1
(this mean if speed > 0.1, you want to walk forward)
b) UNTICK the "Has Exit Time" (if you dont untick, the animation will play finish maybe 15 second before can transition to other animation)
Step14:
Now repeat step 12 and 13 to make another transition from walkforward to idle
a) right click "walkforward"-> make transition , drag the arrow to idle,
b) click the transition arrow, add condition where speed less than 0.1
c) untick the "has exit time"
Step15:
Double click into your "walkforward" on the inspector , change the parameter to "direction"
Step16:
Under your asset folder, right click -> create new C# script, name your script "playerwalk.cs"
Step17:
Drag your "playerwalk.cs" into your character "default avatar" in the scene
Step18:
Drag "myanimation" that you created into your character "default avatar" -> animator -> controller
Step19:
Double click open "playerwalk.cs" and put in below code
/////////////////////////////////////////////////////////////////////////////
using UnityEngine;
using System.Collections;
public class playerwalk : MonoBehaviour {
Animator anim;
// Use this for initialization
void Start ()
{
anim= GetComponent<Animator>();
}
// Update is called once per frame
void Update ()
{
float h = Input.GetAxis("Horizontal");
float v = Input.GetAxis("Vertical");
anim.SetFloat ("Speed", v);
anim.SetFloat ("Direction",h);
anim.speed = 2f;
}
}
Step20: Hit play and try play it
- Now you can control your character to move forward and turn left or turn right
Code Explanation:
a) first you declare a new animator "anim"
b) then you get the <Animator>component so that "anim" now point to your "myanimation"
c) the update function will run every miliseconds
- get the keyboard input WASD or Arrow Key,
- if move left or right, store it inside anim "Direction" (move left direction = -1, move right direction= 1)
- if move forward , store it inside anim "Speed" (move forward speed = 1, move backward speed = -1)
remember the 2 parameter you created in step 11?
-Speed will transition the animation from "idle_netral_1" to "walkforward" back and forth
- Direction will run the animation in "walkforward" either walk left, walk straight or walk right
Step21: if animation is not smooth
a) find your animation inside folder Asset-> raw mocap data -> animation -> walking
b) drag the slider , example you can drag (start at 4second, stop at 8second) click the play to see the animation smooth or not, tick the "LOOP Time" so that during gameplay it will keep looping
There you go, hopefully it will help you in some way


This comment has been removed by the author.
ReplyDeleteThank you for the tutorial, it's really helpful! If you could also add for backwards motion and jumping I think this would be a great defacto tutorial.
ReplyDeleteThis didn't even work for me.
ReplyDeleteIt trips the animations in the animator window when I push the arrow keys but no animations actually play. character doesn't move forward either. Not sure if it was suppose to though.