Sunday, March 22, 2015

Unity 5.0 step by step animation using mecanim guide

Hi,

So today I will try to write a simple easy to follow step by step Unity animation guide

(for beginner only)

Step1: Open Unity

Step2: Open Unity Asset Store

Step3: download "Raw Mocap Data for Mecanim" and import into your project


Step4: Add a plane into your scene, as the ground, set the scale x = 5, y=1, z=5
Step5: drag the raw mocap data -> "default avatar" into your scene


Step6: Under your asset folder, create new animation controller, name it "myanimation"


Step7: double click "myanimation" to open it, then drag the "idle_neutral_1.fbx" into it
(idle_neutral_1.fbx located under Assets-> raw mocap data -> animations -> idle)


so here you can see you start the game with your character in idle

Step8: On your animator tab, right click, create state-> From new blender tree, name it "walkforward"

Step9: double click your "walkforward" to open it and click the "+" sign to add motion, add 3 motion

Step10:
a) first motion set as "WalkForwardTurnRight_NtrlShort"
b) second motion set as "WalkForward_NtrlFaceForw"
c) third motion set as "WalkForwardTurnRight_NtrlShort"

as you can see, first motion and third motion also walk forward turn right, but your first motion need to turn left, so you tick the "mirror" button as below
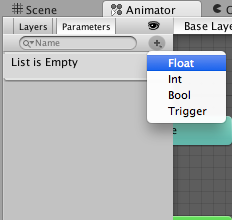
also you click the "0" under the parameter chart, and set it to "-1" just like the display above, this is so later we can tell the computer to turn left when our direction is "-1" , walk foward when direction is "0" and walk right if direction is "1"

Step11:
Now go to parameter tab under your animator tab, and click the "+" sign to add 2 new paramater, add a) a new float name as "Speed"
b) a new float name as "Direction"


Step12:
Now go back to base layer under your animator tab, and right click "idle_neutral_1" and make transition, drag the arrow to the "walkforward"

Step13:
a) Click the transition arrow you created, and on the inspector on the right, click the "+" sign to add new condition where speed greater 0.1
(this mean if speed > 0.1, you want to walk forward)

b) UNTICK the "Has Exit Time"  (if you dont untick, the animation will play finish maybe 15 second before can transition to other animation)


Step14:
Now repeat step 12 and 13 to make another transition from walkforward to idle

a) right click "walkforward"-> make transition , drag the arrow to idle,
b) click the transition arrow, add condition where speed less than 0.1
c) untick the "has exit time"

Step15:
Double click into your "walkforward" on the inspector , change the parameter to "direction"


Step16:
Under your asset folder, right click -> create new C# script, name your script "playerwalk.cs"

Step17:
Drag your "playerwalk.cs" into your character "default avatar" in the scene


Step18:
Drag "myanimation" that you created into your character "default avatar" -> animator -> controller

Step19:
Double click open "playerwalk.cs" and put in below code

/////////////////////////////////////////////////////////////////////////////
using UnityEngine;
using System.Collections;

public class playerwalk : MonoBehaviour {

    Animator anim;
    // Use this for initialization
    void Start () 
    {
        animGetComponent<Animator>();
    }
    
    // Update is called once per frame
    void Update () 
    {
        float h = Input.GetAxis("Horizontal");
        float v = Input.GetAxis("Vertical");
        
        anim.SetFloat ("Speed"v);
        anim.SetFloat ("Direction",h);
        anim.speed = 2f;
    
    }
}


Step20: Hit play and try play it
- Now you can control your character to move forward and turn left or turn right

Code Explanation:
a) first you declare a new animator "anim"
b) then you get the <Animator>component so that "anim" now point to your "myanimation"
c) the update function will run every miliseconds
- get the keyboard input WASD or Arrow Key,
- if move left or right, store it inside anim "Direction" (move left direction = -1, move right direction= 1)
- if move forward , store it inside anim "Speed" (move forward speed = 1, move backward speed = -1)

remember the 2 parameter you created in step 11?
-Speed will transition the animation from "idle_netral_1" to "walkforward" back and forth
- Direction will run the animation in "walkforward" either walk left, walk straight or walk right

Step21: if animation is not smooth
a) find your animation inside folder Asset-> raw mocap data -> animation -> walking
b) drag the slider , example you can drag  (start at 4second, stop at 8second) click the play to see the animation smooth or not, tick the "LOOP Time" so that during gameplay it will keep looping


There you go, hopefully it will help you in some way

Saturday, March 7, 2015

Unity Create Mesh Using Script

Okay, when I try to create a minecraft game by using the instantiate cube method, the game basically crash because if you try to instantiate 5000 cube, the computer simply cannot handle, the other way to do this is to create the mesh using script where you can ask the computer to slowly create mesh and only show the face that your camera see, and ignoring the rest

Lets begin

Step1: Open Unity

Step2: Create an Empty Object, move position to 0,0,0

Step3: Add Mesh Filter and Mesh Renderer to the empty object

Step4: Add a new script, "scratch.cs" to the empty object

Step5: The script as below

////////////////////inside scratch.cs/////////////////////////////////
using UnityEngine;
using System.Collections;

public class scratch : MonoBehaviour 
{


    public float height=50f;
    public float width=50f;


    // Use this for initialization
    void Start () 
    {
        MeshFilter mf = GetComponent<MeshFilter>();
        Mesh mesh;
        mesh = new Mesh();
        mf.mesh=mesh;

        //create vertices
        Vector3 [] vert = new Vector3[4]
        { new Vector3(0,0,0),new Vector3(width,0,0),new Vector3(0,height,0),new Vector3(width,height,0) };


        //create triangle

        int [] tri = new int[6];
        tri[0] = 0;
        tri[1] = 2;
        tri[2] = 1;
        tri[3] = 2;
        tri[4] = 3;
        tri[5] = 1;


        //create normal

        Vector3 [] norm = new Vector3[4];

        norm[0]= -Vector3.forward;
        norm[1]= -Vector3.forward;
        norm[2]= -Vector3.forward;
        norm[3]= -Vector3.forward;

        //create uv
    
        Vector2 [] uv = new Vector2[4];

        uv[0] = new Vector2(0,0);
        uv[1] = new Vector2(1,0);
        uv[2] = new Vector2(0,1);
        uv[3] = new Vector2(1,1);

        //all into mesh
        mesh.vertices=vert;
        mesh.triangles=tri;
        mesh.normals =norm;
        mesh.uv=uv;
    }
    

}

////////////////////////////////////////////

Explanation:
1. for any mesh, you need 
a) Vertices (the coordinate point in 3D world)
b) Triangles (all 3D face is build from triagles)
c) Normals (the face that reflect light and got color )
d) UV (the face that let you put texture)

-Vertices store inside a Vector3 List, for a square face, you got 4
- Triangles store inside a integer List, 3 index point for each triagle, for a square face, you need 6 index point
- Normal store inside a Vector3 List, for a square face, you got 4 same as vertices
- UV store inside a Vector2 List, for a square face, you got 4

after you done all the hardcoding, put all this 4 important data into your mesh, and your mesh will be shown on screen


Step6: Run your game and you can see you just create a square face from script

Thursday, March 5, 2015

Playing with Unity 5 - skybox - terrain - third person controller

Okay so I want to quickly create a game where I can control the character running around a beautiful area with beautiful sky and the control feel like World of Warcraft, and I noticed quite a bit of difference of how things work in Unity 5

1. Skybox
- To do this is, you first need to create a new material, choose shader type skybox-> 6 sided

- download the sky texture here https://www.93i.de/products/media/skybox-texture-set-1
- put 6 texture into front, back, left, right, top, bottom

- Finally on your camera , add component-> rendering -> skybox, and attach the material to your skybox

2. Create Terrain
-> On top of your screen, Game Object -> 3D Object -> Terrain

-> Use the brush to quickly draw some mountain to your terrain


3. If you want to create First Person Controller
-> On top of your screen, Assets -> Import -> Character

-> then drag the "FPSController" Prefab into your scene, put the position 0,0,0 you can play your character instantly


4. If you want to create Third Person Controller
-> drag the "thirdpersoncontroller" prefab into your scene
-> create a camera rig to follow your character, watch the video below if you dont understand my step

-> you download or copy the "camera script" from http://pastebin.com/zGn4HBUS
-> then you drag the "camera script" to your camera
-> then you drag your character into the "target" of your camera script
-> now you can zoom in using "mouse wheel", right click and drag to rotate
(Its now same like world of warcraft camera control, super cool)

There you go, hopefully you have fun same like I do

Wednesday, March 4, 2015

Unity 5 New Physically Based Texture Graphics

Ok, so I download the latest Unity 5, and now exploring how to make cool graphics...

I found the following youtube video


So basically,

1. Launch Unity 5

2. Create a new sphere

3. go to http://www.cgtextures.com/ to get some texture you like
(example brick -> rock)

4. Okay, so if you just use the texture and slap it directly into your new material and directly into your sphere, it look like below in Unity 5


4. after you download the texture, you can go to photoshop or gimp or crazybump to do "normal map"

5. export your "normal map" and put it into your material


Now the sphere have more detail instead of look plain


Tuesday, March 3, 2015

Unreal Engine 4 is now available for free

Holy Shit....this is real

few years ago, this thing cost few hundred thousands and few months ago it cost like $19 per month just to use it, and its now free

So what are you waiting for, go and download it free and check it out yourself

https://www.unrealengine.com/blog/ue4-is-free


Update:
Wow, in order to use unreal engine 4, you need at least quadcore CPU, 8GB ram and one super graphic card, unfortunately, my Macbook Pro only have 4GB ram and one lousy graphic card, so i cannot even launch the unreal engine 4 launcher.....

fortunately Unity 5 just released with improved graphics, guess I just have to stick with Unity