Friday, June 12, 2015

How to Custom Parse PFTableViewCell using Swift

Ok, let say you want to load some data from Parse into your custom made PFTableViewCell, below is the step by step

Step1: Drag a TableViewController into your main scene

Step2: Select your prototype cells, then change the style to "Custom", drag 4 label into your prototype cell and give them tag "10", "20", "30", "40"


Step3: Change the Class of your prototype cell to "PFTableViewCell", because you need to load data from Parse, so you need this


Step4: Create a new File -> Cocoa Touch Class
Class Name: MyTableViewController
SubClassName: PFQueryTableViewController

Then on the main scene, click your table view controller, set your class to "MyTableViewController"


Step5: Open your MyTableViewController.swift

put in the below code

////////////////////////////////////////////////////////////////////////////////////////////////////////

import UIKit
import Parse
import ParseUI

class MyTableViewController: PFQueryTableViewController {

override init!(style: UITableViewStyle, className: String!) {
        super.init(style: style, className: className)
            }

   required init(coder aDecoder: NSCoder) {
        super.init(coder: aDecoder)
        
        // Configure the PFQueryTableView
        self.parseClassName = "Request"
        self.textKey = "item_wanted"
        self.pullToRefreshEnabled = true
        self.paginationEnabled = true 
       self.objectsPerPage = 25   
  
    }

 // Define the query that will provide the data for the table view
    override func queryForTable() -> PFQuery {
        var query = PFQuery(className: "Request")    
        query.includeKey("requester")

        return query
    }

override func tableView(tableView: UITableView, cellForRowAtIndexPath indexPath: NSIndexPath, object: PFObject?) -> PFTableViewCell {
        
        var cell = tableView.dequeueReusableCellWithIdentifier("Cell") as PFTableViewCell!
        if cell == nil {
            cell = PFTableViewCell(style: UITableViewCellStyle.Default, reuseIdentifier: "Cell")
        }


        if let mysubtitle = object?["email"] as? String {
                (cell.contentView.viewWithTag(10) as UILabel).text = mysubtitle
         }
        if let mysubtitle2 = object?["item_wanted"asString {
                (cell.contentView.viewWithTag(20as UILabel).text = mysubtitle2
         }
        if let mysubtitle3 = object?["city"asString {
                (cell.contentView.viewWithTag(30as UILabel).text = mysubtitle3
         }
        if let mysubtitle4 = object?["zipcode"asString {
                (cell.contentView.viewWithTag(40as UILabel).text = mysubtitle4
         }
        
        return cell
}

override func tableView(tableView: UITableView, heightForRowAtIndexPath indexPath: NSIndexPath) -> CGFloat {
        return 50
    }
    

    override func viewDidLoad() {
        super.viewDidLoad()

        // Do any additional setup after loading the view.
    }

    override func didReceiveMemoryWarning() {
        super.didReceiveMemoryWarning()
        // Dispose of any resources that can be recreated.
    }

}

/////////////////////////////////////////////////////////////////////////////////
Code Explanation:
When you are using subclass of PFQueryTableViewController , you need to populate the below function

1.  required init(coder aDecoder: NSCoder)
- this is to initialize the Class, you need to tell which "Table" you want to request from Parse, my example I request to query the table "Request"

2. override func queryForTable() -> PFQuery {
- this is to write your query

3. override func tableView(tableView: UITableView, cellForRowAtIndexPath indexPath: NSIndexPath, object: PFObject?) -> PFTableViewCell {

- this is to specify what need to display on your cell 
- since we already tag our label with "10", "20", "30", "40" so we can populate data from Parse into the cell label by doing the coding below, my column "item_wanted" populate into the label with tag "10"

if let mysubtitle = object?["item_wanted"asString {
                (cell.contentView.viewWithTag(10as UILabel).text = mysubtitle
         }


here is my dummy data i loaded from Parse

hopefully it can hep you in some way

Swift Parse query multiple table and output into PFtableviewcell

Okay, let say I have 2 table in Parse, how do i query both of them and show it into PFtableviewcell?

Table 1: User
Column: username, email, address

Table 2: Request
Column: item_wanted, username

Note: username in Table2 is a "pointer" that point to Table 1 (you must use pointer)


import UIKit
import Parse
import ParseUI


class TableViewController2: PFQueryTableViewController {

override func queryForTable() -> PFQuery {
        var query = PFQuery(className: "Request")
        query.includeKey("username")
        return query

    }


override func tableView(tableView: UITableView, cellForRowAtIndexPath indexPath: NSIndexPath, object: PFObject?) -> PFTableViewCell {
        
        var cell = tableView.dequeueReusableCellWithIdentifier("Cell") as PFTableViewCell!
        if cell == nil {
            cell = PFTableViewCell(style: UITableViewCellStyle.Default, reuseIdentifier: "Cell")
        }


         if let myrequester = object?["username"] as? PFObject
        {
            if let myusername = myrequester["username"] as? String
            {
                   cell.textLabel?.text = myusername
            }
        }


        if let mysubtitle = object?["item_wanted"] as? String 
       {
            cell?.detailTextLabel?.text = mysubtitle
        }
        
        return cell
        
        
    }
}


///////////////////////////////////////////////////////////////

Key Note 1: You must use query.includeKey("username"), this mean you want Parse to include all the data from the table "User" using the key "username"

Key Note 2: Since it is double layer, you query table "Request" then into table "User" , so you need to access the data double layer
 if let myrequester = object?["username"asPFObject
        {
            if let myusername = myrequester["username"asString
            {
                   cell.textLabel?.text = myusername
            }
        }

you access the object["username") to get to the table "User" then you need to do it one more time myusername = myrequester["username"] 

hopefully I can help you in anyway, cheers


Thursday, June 11, 2015

Swift Convert CLLocation to Parse PFgeopoint

So let say you want to convert CLLocation to Parse PFGeopoint

let say your CLLocation = placemark.location

here is it


 user["geo"] = PFGeoPoint(location: placemark.location)

Monday, June 1, 2015

SWIFT HOW TO CONVERT ADDRESS TO COORDINATE IN MKMapview


Today I am trying to play around with MKMapview, I want to display location once the program is loaded,

a) Using coordinate (Step 1 to Step 7)
b) Using address I key in myself (Step 1 to Step 8)


Step1: Open Xcode

Step2: In Main Storyboard, drag MKMapview into your ViewController

Step3: Create a new file Cocoa Touch Class


Step4: Name it MapVC, Subclass of UIViewController


Step5: On the storyboard, click your MKMapView and on the right hand side -> "identity inspector" change the Class to "MapVC"


Step6: On the storyboard, click "Assistant Editor" on top to open the code side by side with your MKMapView, Control Drag your MKMapView to your "MapVC" code to create a variable connection,

see the diagram
@IBOutlet weak var mapView: MKMapView!


Step7: Put in the below code so once you open the app, it will load the location base on the coordinate i put

////////////////////////////////////////////////////////////////////////////

import UIKit
import MapKit
import CoreLocation

class MapVC: UIViewController
{
    @IBOutlet weak var mapView: MKMapView!
    var  initialLocation = CLLocation(latitude: 21.282778, longitude: -157.829444)


    override func viewDidLoad() {
        super.viewDidLoad()
        centerMapOnLocation(initialLocation)
    }


    func centerMapOnLocation(location: CLLocation)
    {
        
        let regionRadius: CLLocationDistance = 1000
        
        let coordinateRegion = MKCoordinateRegionMakeWithDistance(location.coordinate,
            regionRadius * 2.0, regionRadius * 2.0)
        mapView.setRegion(coordinateRegion, animated: true)
    }
}


/////////////////////////////////////////////////////////////////////

Code Explanation:
first you create a new variable "initialLocation" then you hardcode it with the coordinate you like

then you create a function "centerMapOnLocation" that set the mapView region to 1000 meter within the coordinate you give

finally on viewDidLoad() you call this function providing the parameter "initialLocation"


Step8: If you want to use the address instead, then you need to convert the address into coordinate, to do this, modify the MapVC.swift to below
////////////////////////////////////////////////////////////////////////////////////////

import UIKit
import MapKit
import CoreLocation

class MapVC: UIViewController
{
    @IBOutlet weak var mapView: MKMapView!
    var  initialLocation = CLLocation(latitude: 21.282778, longitude: -157.829444)


    override func viewDidLoad() {
        super.viewDidLoad()
       var address = "1 Infinite Loop, CA, USA"
        var geocoder = CLGeocoder()
        geocoder.geocodeAddressString(address, {(placemarks: [AnyObject]!, error: NSError!) -> Void in
            if let placemark = placemarks?[0] as? CLPlacemark
            {
               
                self.initialLocation = placemark.location
                self.centerMapOnLocation(self.initialLocation)
               
            }
        })
    }


    func centerMapOnLocation(location: CLLocation)
    {
        
        let regionRadius: CLLocationDistance = 1000
        
        let coordinateRegion = MKCoordinateRegionMakeWithDistance(location.coordinate,
            regionRadius * 2.0, regionRadius * 2.0)
        mapView.setRegion(coordinateRegion, animated: true)
    }
}


/////////////////////////////////////////////////////////////////////

Code Explanation, so here you create a new variable "address" and type in the address that you like, then you use the CLGeocoder to convert the address into coordinate, load the coordinate into "initialLocation" then finally call the function "centerMapOnLocation" to display it in the map


There you go, hopefully it can help you in some way

Wednesday, May 20, 2015

My newest App: Lazy Cure

So today I launch my latest app "lazy cure"

Lazy Cure is an app designed to kick start you to work

Feature:
1. Easy one button screen with personal coach that ask you to follow his step by step order
2. Personal Coach that yell at you ask you to get off the bed, write down what you want to do now, and force you to work for 1 minutes
3. If you can start your work just for 1 minutes, you can continue your momentum to finish your work
4. The app will keep track how many seconds you have worked and save the high score to Game centre
5. The more you play this app, the more work you can start doing and finished it quickly


Sunday, May 10, 2015

My Newest App: Where is my stuff now

So my dad want to build an app that help people remember where is their stuff, example, you can take a photo of your hat, and then another photo of your bedroom closet, then you can store them inside the app reminding the future you where is the location of the hat

So he spend couple of month learning how to code, and code it from beginning to the end without my help, the only thing I help is to publish it for him

check it out at
https://itunes.apple.com/us/app/where-is-my-stuff-now/id990926443?ls=1&mt=8

Friday, May 8, 2015

Unity Step by Step How to setup Game Center for IOS

Hello,

So I just learned how to setup Game Center for IOS in Unity I will show you how

Step1: Open https://itunesconnect.apple.com

Step2: Create new app

Step3: Under the "Game Center" tab, add a new leaderboard, give a leaderboard ID and leaderboard name, example leaderboard ID "mygame"

Step4: Open Unity

Step5: Create a new C# script "game.cs" and attach to the camera

Step6: put the following code into your script


//////////inside game.cs/////////////////////////////////

using UnityEngine.SocialPlatforms;    
public class game : MonoBehaviour 
{

    int score;

    void Start () 
    {

         score=3;
         Social.localUser.Authenticate (ProcessAuthentication);

    }

    void ProcessAuthentication (bool success
    {
    

        if (success
        {
            Debug.Log ("Authentication successful");
            Social.CreateLeaderboard();
            Social.CreateLeaderboard().id = "mygame";

        }
        else
        {
            Debug.Log ("Failed to authenticate");
        }
    }


    void OnGUI() 
    {

            if(GUI.Button (new Rect (480f,1500f,300f,300f), "<color=white><size=80>SUBMIT</size></color>"))
            {
                Social.ReportScore(score,"mygame",HighScoreCheck);


            }


            if(GUI.Button (new Rect (950f,1500f,300f,300f), "<color=white><size=40>STAT</size></color>"))
            {
                Social.ShowLeaderboardUI();


            }


    }


    static void HighScoreCheck(bool result
    {
        if(result)
            Debug.Log("score submission successful");
        else
            Debug.Log("score submission failed");
    }

}
/////////////////////////////////////////////////

Code Explanation:
1. Under the Start() function, you put Social.localUser.Authenticate (ProcessAuthentication);

- This mean you try to login the user to the game center

2. void ProcessAuthentication (bool success

- This is the function that process the user login, after user login successfully, you create a leaderboard with id "mygame", must match the ID you created on step 3

3. void OnGUI() 
    
- This is the function that show 2 button, button 1 "Submit" let you submit your highscore to the leaderboard, button 2 "Stat" will load the game center showing your highscore

4. static void HighScoreCheck(bool result


- This is the function that tell you if the score submission is successful or not

//////////////////////////////////////////////////////////
Step7: You can run in Unity to test but the "Game Center" leaderboard screen will not appear in Unity

Step8: Build your Unity Project into IOS Xcode

Step9: Open your IOS Xcode in Xcode

Step10: Under XCode, On Capabilities Tab, turn the GameCenter "ON"

Step11: Plug your Iphone to your Mac, and run the XCode program into your Iphone to test it

Step12: It might take a while before the highscore showing, for my case, when i click the "submit" then "stat" , the Game Center leaderboard opened and showed "No Item", after 3 hour, I open my program again and click "stat" I can see my highscore showing on the Game Center Leaderboard

There you go, hopefully it can help you in some way =)


Wednesday, May 6, 2015

Selling My Multiplayer Space Shooter Source Code

Hello everyone, since Unity Asset Store rejected all my submission, I have no choice but to sell my source code on my blog,

so here it is

http://fundurian.binpress.com/product/multiplayer-space-shooter/2952


Games Feature:

  • Player can host room and play with others
  • Up to 4 players per room 
  • Up to 300 level
  • Weapon upgrade and ship upgrade
  • Enemy get stronger every 3 level and give more money
  • Mini boss at every 10 level
  • Reach 100 meter to win the level
  • Player can chat inside the room

Package Includes:

  • Step by step PDF set up guide
  • Source Code
  • One 3D Main Ship with 10 colors
  • Four 3D small enemy ship and 1 boss ship
  • Gold coin and rocks

For $20 only


Friday, May 1, 2015

Unity Asset Store just rejected 2 of my submission

So, I am trying to get some stuff up on Unity Asset Store to see the market data, but they keep rejecting me, so far I have submitted 2 product

1. GUI button layout
- So I created 10 unique GUI button skin and try to sell for $2, Unity Asset Store said "they are not interested"

2. Multiplayer Space Shooter
- So I try to sell my completed project "multiplayer space shooter" on Unity Asset Store, they said " they decided not to publish" without giving me any reason why

So sad, I would just have to find some alternative market to try sell my stuff


I am launching entreprenuer time tracker app

Ok,  so besides games, I would also like to launch some app into the appstore, I just launch "Entrepreneur time tracker" , it is a very simple app where you can specify 5 most important task then you just track how much time you are spending on your important task by pressing 1 button, then it will track, and you press the "stop" button then it will stop, and it will record your statistic through out the year


https://itunes.apple.com/us/app/entrepreneur-time-tracker/id925308960?mt=8

Sunday, April 5, 2015

Blender Attempting to create a mouth full of teeth

Okay, So I want to create a scolding guy and I want his mouth to open really big and show all his teeth,

So I started to build teeth,

After I completed all 14 teeth for the bottom, and 14 teeth for the top , i add in some gum


Ya, i know its low poly, but I am noob in this, so i just continue, then i try to create a mouth and put the teeth into it


Next is to add one tongue


So here i got a really big mouth with some teeth and tongue, of coz it is not finish yet, but I will update it later


finally i cut out the head of my character and put the mouth in, so now my character have a really big mouth full of teeth, and some kind of tongue

Friday, April 3, 2015

6 month Indie Game Dev Post Mortem

I quit my job 6 month ago and venture into indie game dev to try my luck and below is the result

First Month: 
Spend 30 days to create "Programmer 9-5 day job" and then launch into Apple Appstore, Google Playstore, kongregate, newgrounds

Why I choose to create this game:
I want to try the paid model of the appstore, where I sell the game for $1 each and test the market, also I find there is 0 day job game on the market so I would like to create the first day job game to see if it is fun or not

Marketing effort:
Post on reddit, Post on blog, spend $5 on fiverr to broadcast to 100k twitter user

revenue so far for 5 months, I round it up

Appstore : $100 (100 sales)
Playstore : $5 (5 sales)
kongregate: $10 (10,000 play)
Newgrounds: $10 (10,000 play)


Second Month:
Spend 30 days to create "Billionaire Curse" and then launch it

Why I choose to create this game:
I want to try to create a game where I want to let user try to have a feel to be a billionaire and then spend all the money in 10 days, I created 10 places for the user to spend money, there is none of this game type on the market yet so I would like to try it out to see if it is fun or not

Marketing effort:
Post on reddit, Post on blog

revenue so far for 4 months, I round it up

Appstore: $100 (100 sales)
Playstore: $15 (15 sales)
kongregate: $0.7 (700 play)
newgrounds: $0.5 (500 play)


Third Month:
Spend 30 days to create "Idle zombie Spitter"

Why I choose to create this game:
Here is where I want to try the free model, where I publish the game for free, and then let the user play for free and then display the Advertisement inside the game and also put some In app purchase, also I would like to try to create my first Idle game and see how it goes.

Marketing effort:
Post on reddit, Post on blog

revenue so far for 3 months, I round it up

Appstore: $28 (11 In app purchase)
Playstore: $0
kongregate: $15 (15,000 play)
newgrounds: $0.5 (500 play)
chartboost: $4 (advertisement in app)


Fourth Month:
Spend 60 days to create "Multiplayer Space Shooter"

Why I choose to create this game:
Here I want to try to create my first multiplayer games where user can play together at the same time and also see how it goes

Marketing effort:
Post on reddit, Post on blog

revenue so far for 3 months, I round it up

Appstore: $0
Playstore: $0
kongregate: $1 (1,000 play)
newgrounds: $1 (1,000 play)
chartboost: $0


Conclusion: If you are indie, paid games is better than free games, and also idle games is better than multiplayer games, and finally, dont quit your job

So here it is, my 6 month journey, it is very grim, but I will continue

Thursday, April 2, 2015

Unity here is how I save triple array using playerpref

Let say you have an array you want to save into Unity using playerpref, and you have a triple array of 50 x 50 x 50 = size of 125,000


public int[,,] map;

    void Start()
    {
        map = new int[50, 50, 50];
        
    }


/////////////////////////////////////
Below is how I do it
///////////////////////////////////

public void savegame()
    {
        for (int y = 0y < 50y++)
        {
            
            for (int x = 0x < 50x++)
            {
                for (int z = 0z < 50z++)
                {
                    if(map[x,y,z]!=0)
                    {

                        PlayerPrefs.SetInt ("mymap"+x+"E"+y+"E"+z+"E",map[x,y,z]);
                        Debug.Log ("saving " + "mymap"+x+"E"+y+"E"+z+"E");
                    }
                }
            }
        }
    }

    void loadgame()
    {
        for (int y = 0y < 50y++)
        {
            
            for (int x = 0x < 50x++)
            {
                for (int z = 0z < 50z++)
                {

                    map[x,y,z]=PlayerPrefs.GetInt ("mymap"+x+"E"+y+"E"+z+"E");
                        
                }
            }
        }

   }

Sunday, March 22, 2015

Unity 5.0 step by step animation using mecanim guide

Hi,

So today I will try to write a simple easy to follow step by step Unity animation guide

(for beginner only)

Step1: Open Unity

Step2: Open Unity Asset Store

Step3: download "Raw Mocap Data for Mecanim" and import into your project


Step4: Add a plane into your scene, as the ground, set the scale x = 5, y=1, z=5
Step5: drag the raw mocap data -> "default avatar" into your scene


Step6: Under your asset folder, create new animation controller, name it "myanimation"


Step7: double click "myanimation" to open it, then drag the "idle_neutral_1.fbx" into it
(idle_neutral_1.fbx located under Assets-> raw mocap data -> animations -> idle)


so here you can see you start the game with your character in idle

Step8: On your animator tab, right click, create state-> From new blender tree, name it "walkforward"

Step9: double click your "walkforward" to open it and click the "+" sign to add motion, add 3 motion

Step10:
a) first motion set as "WalkForwardTurnRight_NtrlShort"
b) second motion set as "WalkForward_NtrlFaceForw"
c) third motion set as "WalkForwardTurnRight_NtrlShort"

as you can see, first motion and third motion also walk forward turn right, but your first motion need to turn left, so you tick the "mirror" button as below

also you click the "0" under the parameter chart, and set it to "-1" just like the display above, this is so later we can tell the computer to turn left when our direction is "-1" , walk foward when direction is "0" and walk right if direction is "1"

Step11:
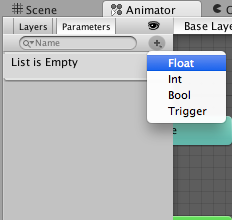
Now go to parameter tab under your animator tab, and click the "+" sign to add 2 new paramater, add a) a new float name as "Speed"
b) a new float name as "Direction"


Step12:
Now go back to base layer under your animator tab, and right click "idle_neutral_1" and make transition, drag the arrow to the "walkforward"

Step13:
a) Click the transition arrow you created, and on the inspector on the right, click the "+" sign to add new condition where speed greater 0.1
(this mean if speed > 0.1, you want to walk forward)

b) UNTICK the "Has Exit Time"  (if you dont untick, the animation will play finish maybe 15 second before can transition to other animation)


Step14:
Now repeat step 12 and 13 to make another transition from walkforward to idle

a) right click "walkforward"-> make transition , drag the arrow to idle,
b) click the transition arrow, add condition where speed less than 0.1
c) untick the "has exit time"

Step15:
Double click into your "walkforward" on the inspector , change the parameter to "direction"


Step16:
Under your asset folder, right click -> create new C# script, name your script "playerwalk.cs"

Step17:
Drag your "playerwalk.cs" into your character "default avatar" in the scene


Step18:
Drag "myanimation" that you created into your character "default avatar" -> animator -> controller

Step19:
Double click open "playerwalk.cs" and put in below code

/////////////////////////////////////////////////////////////////////////////
using UnityEngine;
using System.Collections;

public class playerwalk : MonoBehaviour {

    Animator anim;
    // Use this for initialization
    void Start () 
    {
        animGetComponent<Animator>();
    }
    
    // Update is called once per frame
    void Update () 
    {
        float h = Input.GetAxis("Horizontal");
        float v = Input.GetAxis("Vertical");
        
        anim.SetFloat ("Speed"v);
        anim.SetFloat ("Direction",h);
        anim.speed = 2f;
    
    }
}


Step20: Hit play and try play it
- Now you can control your character to move forward and turn left or turn right

Code Explanation:
a) first you declare a new animator "anim"
b) then you get the <Animator>component so that "anim" now point to your "myanimation"
c) the update function will run every miliseconds
- get the keyboard input WASD or Arrow Key,
- if move left or right, store it inside anim "Direction" (move left direction = -1, move right direction= 1)
- if move forward , store it inside anim "Speed" (move forward speed = 1, move backward speed = -1)

remember the 2 parameter you created in step 11?
-Speed will transition the animation from "idle_netral_1" to "walkforward" back and forth
- Direction will run the animation in "walkforward" either walk left, walk straight or walk right

Step21: if animation is not smooth
a) find your animation inside folder Asset-> raw mocap data -> animation -> walking
b) drag the slider , example you can drag  (start at 4second, stop at 8second) click the play to see the animation smooth or not, tick the "LOOP Time" so that during gameplay it will keep looping


There you go, hopefully it will help you in some way